
State machines are a powerful tool for creating complex and dynamic behaviors in Unity. A state machine is a system that defines a set of states, transitions between those states, and actions that occur when a transition occurs. In Unity, state machines can be created using the State Machine Behaviour component, which is part of the Animator component.
Here are some ways in which state machines can be used in Unity:
- Character AI: State machines can be used to create complex AI behaviors for characters in a game. A state machine is able to control the behavior of a character by defining its actions in different situations. It can determine how the character behaves when it is not doing anything, how it reacts and moves when an enemy is detected, and how it launches its attacks during a combat scenario.
- Game mechanics: State machines can be used to define the behavior of game mechanics, such as puzzles or obstacle courses. For example, a state machine could define the different states of a puzzle and the transitions between those states.
- Animation: State machines can be used to control the animation of game objects. For example, a state machine could define how a character’s animation changes when it is walking or running.
- UI: State machines can be used to control the behavior of UI elements in a game. For example, a state machine could define the different states of a menu and the transitions between those states.
When using state machines in Unity, it is important to design them carefully and test them thoroughly. State machines can become very complex, so it’s important to keep them organized and well-documented. Using state machines can help simplify complex behaviors and create more dynamic and interesting gameplay experiences.
We have also written another article with a more in depth overview on how to implement state machines.
States Machines
In Unity, it is relatively easy to add basic logic to an object. A simple script can be added to make an object jump whenever the jump button is pressed, for instance.
However, in most games, a player will have multiple actions available to them beyond just jumping. As more actions are added, such as running, ducking, and sliding, managing how and when they are triggered can become more challenging.
For example, preventing a player from jumping while they are already in mid-air or sliding on the ground without first running can be complex. To address this, one option is to utilize if statements to check the player’s current actions before allowing them to perform another action.
While relying on if conditions can be effective, it can become cumbersome to manage all the possible conditions that may impact an object’s behavior.
In cases where multiple if conditions are needed to keep the code in a script organized, using a State Machine may be a better approach. A State Machine is a programming design pattern that enables an object or system to behave differently based on its current circumstances.
By using a State Machine, you can effectively manage the logic flow in your game and control how objects behave in various contexts. State Machines can be used to build basic enemy AI and manage global game state, making them a powerful tool for game development.
This article explores how State Machines work in Unity, their applications, and when it may not be necessary to use one. By understanding these concepts, you can decide for yourself whether a State Machine will simplify your game development process.
Here’s what you’ll find on this page:
What are state machines?
State Machines in Unity are a design pattern that enable processing of logic based on the current state of an object or system. The advantage of this approach is that it allows developers to focus only on the logic that’s relevant to the current situation and conditions that could cause a change, ignoring everything else.
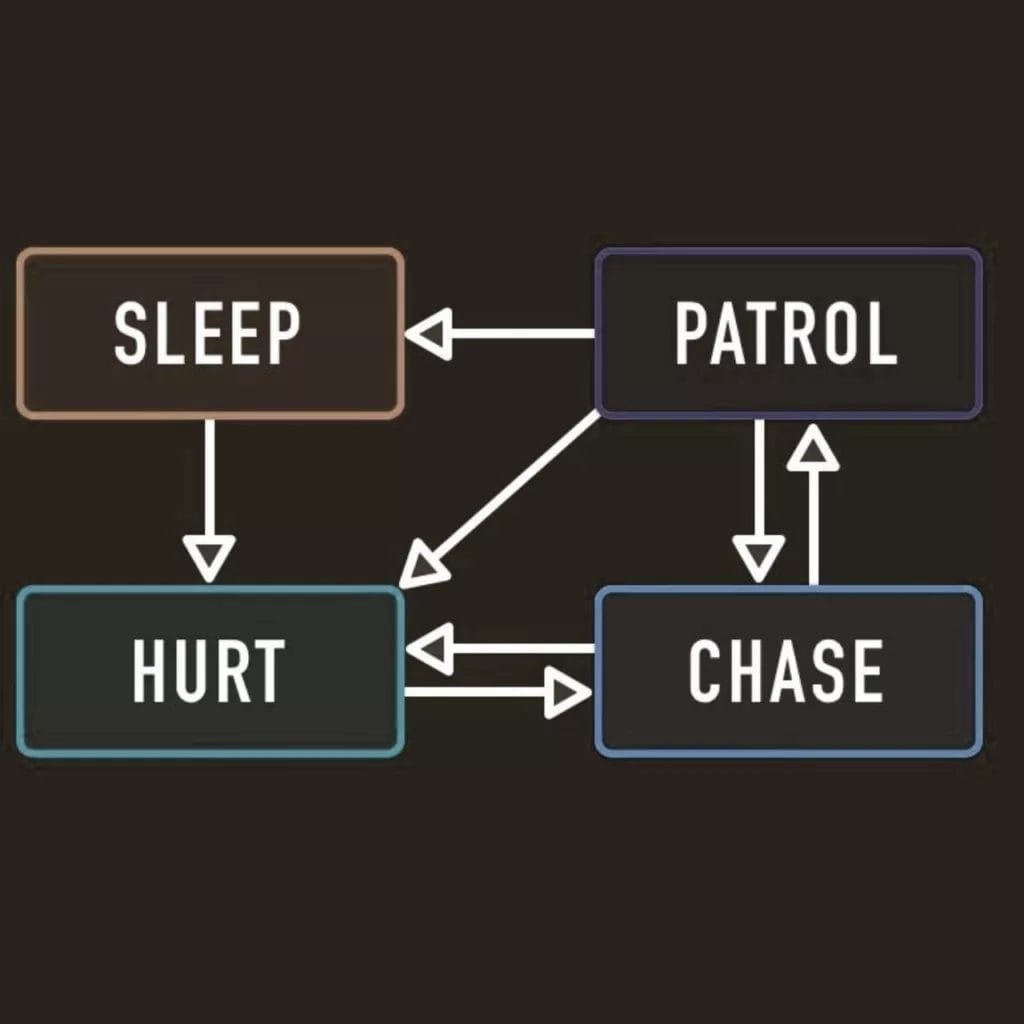
Using State Machines can simplify the development process, particularly when dealing with objects that have complex behavior. For instance, an enemy object may have two states: a Patrol State and a Chase State. In the Patrol State, the enemy wanders around aimlessly, while in the Chase State, it pursues the player once it detects them.
By using a State Machine, developers can create dynamic systems that adapt to the current context of the game, making it easier to manage the behavior of objects and systems.
For example, an enemy object might have five states, a Idle, chase, Attack, Damage and die State.
When the enemy is guarding some place, it’s stays in the same place, but when it sees the player, it starts to chase him.
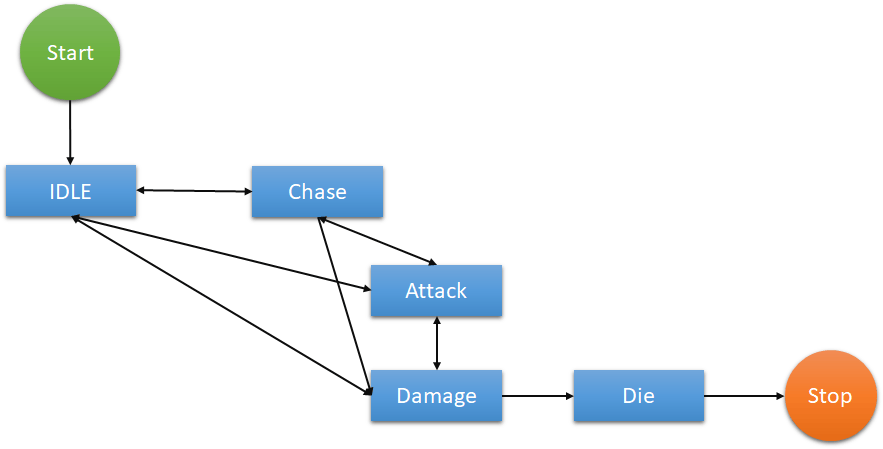
To accomplish this task through scripting, you would typically need to verify if the player is within the enemy’s line of sight and then modify the enemy’s behavior accordingly. If the only change in behavior required is the direction of movement, then implementing it in a single script shouldn’t be too complicated.
However, incorporating additional features into the enemy script, such as animations to signal when they’ve detected the player or new states like Sleep or Hurt, can make it challenging to manage the enemy’s actions. This is because you’ll need to check the enemy’s current state before allowing them to perform another action.
public void DetectEnemy()
{

    if(idle)
    {
        // Chase!
    }
}
In a simple system, managing multiple conditions may not pose a significant issue. However, as the number of potential interfering conditions grows, it can quickly become complicated, requiring checking each condition before proceeding with an action.
State Machines offer a solution to this problem by altering how system states are evaluated. Instead of evaluating the entire system, each state only considers its own behavior and the factors that can trigger its change.
For example, when in a Sleep State, the system does not need to move or search for the player, and only being Hurt can cause the enemy to enter a different state. In contrast, while in a Patrol State, taking damage or detecting the player will trigger the enemy to give chase. When in the Chase State, losing sight of the player causes the enemy to revert to the Patrol State, and if enough time elapses, it may return to the Sleep State.
In essence, state machines enable you to concentrate solely on the behavior that a particular state permits while disregarding everything else. However, how exactly do state machines operate?
How do State Machines in work in Unity engine
While there are various ways to create a state machine in Unity, most state machines comprise similar elements and operate in a comparable manner.
For instance, a controlling element, such as a Delegate Function or an Enum, typically manages the active state and calls the logic within each state. Each state contains behavior that is exclusive to that state, and only one state is active at a time, making state machines advantageous for determining an object’s current state based on which state it’s in.
The state machine provides input to the state, such as shared functions, user input, and parameters. It’s then up to the state to interpret the information and determine if the current state needs to change, known as a transition.
When a transition occurs, the state machine typically calls an Exit function on the old state to decommission it and an Enter function on the new one to set it up or perform any initial actions.
So when would you use a state machine?
When to use a State Machine?
Although state machines can be useful, they can also make a simple problem more complicated or add limitations to a complex problem that requires a different solution. Therefore, there are no hard and fast rules about when to use a state machine, and it is generally advisable to avoid starting with one unless you know it is the best option for your particular situation.
To determine whether a state machine is the right choice, consider its main advantages:
- It enables you to selectively ignore code that shouldn’t be running while other code is running (i.e., you have distinct states of functionality).
- It allows you to restrict the conditions of change to only the current state, ensuring that only the current state can determine what could trigger a transition.
If you find yourself writing multiple conditional checks to separate your script’s logic, or if you’re concerned that something else might cause your script to execute the wrong code at the wrong time, a state machine may be a good option. However, if you struggle to distinguish between each state or if you notice that you’re repeating the same code in each state, it may be a sign that a different approach would be more effective.
State machines and behaviour trees are two different approaches to building systems with complex behaviour.
Ultimately, the choice between state machines and behaviour trees depends on the specific requirements of the system you are building, and it may be necessary to use a combination of both approaches to achieve the desired behaviour.
When utilized effectively, state machines can greatly benefit by restricting an object’s possible actions depending on its current state. However, you may be wondering, how do you create a state machine in the first place?
How to code a State Machine with Unity
There are various techniques to create a state machine, and there is no single correct method. However, the general approach is consistent, in which a controlling script processes one of several states that are created using different techniques.
The states are usually distinct scripts, but they must be able to be treated as if they are all of the same class for this approach to work. One common way to achieve this is by using an Interface.
How to make s state Machine with Unity and without fancy code
It is possible to create a simple state machine in Unity using just booleans and switch case statements. Here is an example implementation:
public class StateMachine : MonoBehaviour
{
    private bool isWalking = false;
    private bool isRunning = false;

    private void Update()
    {
        // Check for state changes
        if (Input.GetKeyDown(KeyCode.W))
        {
            isWalking = true;
            isRunning = false;
        }
        else if (Input.GetKeyDown(KeyCode.R))
        {
            isWalking = false;
            isRunning = true;
        }
        else if (Input.GetKeyDown(KeyCode.S))
        {
            isWalking = false;
            isRunning = false;
        }

        // Switch between states
        switch (true)
        {
            case bool _ when isRunning:
                RunState();
                break;
            case bool _ when isWalking:
                WalkState();
                break;
            default:
                IdleState();
                break;
        }
    }

    private void IdleState()
    {
        Debug.Log("Idle State");
    }

    private void WalkState()
    {
        Debug.Log("Walk State");
    }

    private void RunState()
    {
        Debug.Log("Run State");
    }
}
In this example, we have three states: idle, walking, and running. The state is determined by the values of the isWalking and isRunning booleans. When one of these booleans is set to true, it indicates a state change. The Update() method checks for these state changes and sets the appropriate boolean values.
The switch statement then checks the boolean values and calls the corresponding state method. If neither isWalking nor isRunning is true, then the state is idle.
While this implementation is very basic and limited, it demonstrates the principles of a state machine using only booleans and switch case statements.
How to make a State Machine with Unity (using enums)
Using enums: Enums are a type of variable that allow you to define a set of named constants. You can create an enum for each state, and use a single enum variable to represent the current state of the machine. Then, you can use a switch statement to handle the state transitions
public class StateMachine : MonoBehaviour
{
    public enum States { Idle, Walking, Running, Jumping }

    private States currentState = States.Idle;

    void Update()
    {
        switch (currentState)
        {
            case States.Idle:
                // Handle idle state
                break;
            case States.Walking:
                // Handle walking state
                break;
            case States.Running:
                // Handle running state
                break;
            case States.Jumping:
                // Handle jumping state
                break;
            default:
                Debug.LogError("Invalid state!");
                break;
        }
    }

    public void ChangeState(States newState)
    {
        // Exit the current state
        switch (currentState)
        {
            case States.Idle:
                // Exit idle state
                break;
            case States.Walking:
                // Exit walking state
                break;
            case States.Running:
                // Exit running state
                break;
            case States.Jumping:
                // Exit jumping state
                break;
            default:
                Debug.LogError("Invalid state!");
                break;
        }

        // Enter the new state
        switch (newState)
        {
            case States.Idle:
                // Enter idle state
                break;
            case States.Walking:
                // Enter walking state
                break;
            case States.Running:
                // Enter running state
                break;
            case States.Jumping:
                // Enter jumping state
                break;
            default:
                Debug.LogError("Invalid state!");
                break;
        }

        currentState = newState;
    }
}
In this example, we define an enum called States that represents each state in the state machine. We then create a private variable called currentState that holds the current state of the machine.
In the Update function, we use a switch statement to handle the behavior of each state. We then create a public function called ChangeState that takes a States variable as its parameter. This function is responsible for exiting the current state, entering the new state, and updating the currentState variable.
To use this state machine, you would call the ChangeState function whenever you want to transition to a new state. For example:
public class PlayerController : MonoBehaviour
{
    private StateMachine stateMachine;

    void Start()
    {
        stateMachine = GetComponent<StateMachine>();
    }

    void Update()
    {
        if (Input.GetKeyDown(KeyCode.Space))
        {
            stateMachine.ChangeState(StateMachine.States.Jumping);
        }
        else if (Input.GetKeyDown(KeyCode.W))
        {
            stateMachine.ChangeState(StateMachine.States.Walking);
        }
        // etc...
    }
}
In this example, we create a PlayerController script that holds a reference to the StateMachine component on the same game object. In the Update function, we check for input and call the ChangeState function with the appropriate state. This will cause the state machine to transition to the new state and update its behavior accordingly.
How to make a State Machines in Unity (using delegates)
Using delegates: Delegates are a type of variable that store a reference to a method. You can create a delegate for each state, and use a single delegate to represent the current state of the machine. Then, you can assign the appropriate delegate for each state, and use a simple if statement to handle the state transitions.
Step 1: Define the Delegate
First, you’ll need to define a delegate for each state. The delegate should have a return type of void and take no parameters. For example:
public delegate void StateDelegate();
Step 2: Create the States
Next, you’ll need to create a class for each state. Each class should have a public method that corresponds to the state’s behavior. For example:
public class PatrolState
{
    public void Update()
    {
        // Patrol behavior goes here
    }
}

public class ChaseState
{
    public void Update()
    {
        // Chase behavior goes here
    }
}

public class AttackState
{
    public void Update()
    {
        // Attack behavior goes here
    }
}
Step 3: Create the State Machine

Now you can create the state machine itself. In the state machine class, define a variable to store the current state delegate:
Step 3: Create the State Machine
Now you can create the state machine itself. In the state machine class, define a variable to store the current state delegate:In the constructor, assign the initial state:
public StateMachine()
{
    currentState = new StateDelegate(Patrol);
}
Next, create methods for each state that assign the appropriate delegate to the currentState variable:
private void Patrol()
{
    currentState = new StateDelegate(Chase);
}

private void Chase()
{
    currentState = new StateDelegate(Attack);
}

private void Attack()
{
    currentState = new StateDelegate(Patrol);
}
Step 4: Use the State Machine
Now you can use the state machine in your game code. Simply create an instance of the state machine and call the Update method in your game loop:
private StateMachine stateMachine = new StateMachine();

void Update()
{
    stateMachine.Update();
}
And that’s it! You now have a simple state machine that uses delegates to handle state transitions. You can add more states by creating additional classes and corresponding methods in the state machine class.
How to make a State Machines in Unity (using Scriptable Objects)
ScriptableObjects are assets in Unity that allow you to store data and code separately from game objects. You can create a ScriptableObject for each state, and use a single ScriptableObject to represent the current state of the machine. Then, you can use a switch statement to handle the state transitions.
Step 1: Create a ScriptableObject for each state
Create a new ScriptableObject for each state that you want to represent in the state machine. This ScriptableObject will store the data and behavior for the state. For example, let’s create a PatrolState and a ChaseState:
using UnityEngine;

[CreateAssetMenu(fileName = "New Patrol State", menuName = "State Machine/Patrol State")]
public class PatrolState : ScriptableObject
{
    public void EnterState()
    {
        Debug.Log("Entering Patrol State");
    }

    public void UpdateState()
    {
        Debug.Log("Updating Patrol State");
    }

    public void ExitState()
    {
        Debug.Log("Exiting Patrol State");
    }
}

[CreateAssetMenu(fileName = "New Chase State", menuName = "State Machine/Chase State")]
public class ChaseState : ScriptableObject
{
    public void EnterState()
    {
        Debug.Log("Entering Chase State");
    }

    public void UpdateState()
    {
        Debug.Log("Updating Chase State");
    }

    public void ExitState()
    {
        Debug.Log("Exiting Chase State");
    }
}
Step 2: Create a ScriptableObject to represent the current state
Create a new ScriptableObject to represent the current state of the machine. This ScriptableObject will be used to store the reference to the current state. For example:
using UnityEngine;

[CreateAssetMenu(fileName = "New State Machine", menuName = "State Machine/State Machine")]
public class StateMachine : ScriptableObject
{
    public ScriptableObject currentState;
}
Step 3: Create a MonoBehaviour to control the state machine
Create a new MonoBehaviour to control the state machine. This MonoBehaviour will contain the logic for transitioning between states. For example:
using UnityEngine;

public class StateMachineController : MonoBehaviour
{
    public StateMachine stateMachine;
    public PatrolState patrolState;
    public ChaseState chaseState;

    void Start()
    {
        // Set the initial state to the patrol state
        stateMachine.currentState = patrolState;
        stateMachine.currentState.EnterState();
    }

    void Update()
    {
        // Check for state transitions
        if (Input.GetKeyDown(KeyCode.Space))
        {
            // Switch to the chase state
            stateMachine.currentState.ExitState();
            stateMachine.currentState = chaseState;
            stateMachine.currentState.EnterState();
        }
        else if (Input.GetKeyDown(KeyCode.Return))
        {
            // Switch to the patrol state
            stateMachine.currentState.ExitState();
            stateMachine.currentState = patrolState;
            stateMachine.currentState.EnterState();
        }

        // Update the current state
        stateMachine.currentState.UpdateState();
    }
}
Step 4: Create a GameObject and attach the StateMachineController script Create a new GameObject in the Unity Editor and attach the StateMachineController script to it. Then, assign the appropriate ScriptableObjects to the stateMachine, patrolState, and chaseState variables in the Inspector.
Step 5: Test the state machine Run the game and test the state machine by pressing the Space and Return keys to transition between states. You should see the appropriate messages logged to the console for each state transition.
How to make a State Machines in Unity (using Interfaces)
Interfaces provide a way to treat two different scripts as if they were the same, by requiring a class that implements a specific interface to include a set of predefined functions.
In Unity, interfaces can be useful for creating state machines, where a controlling script processes different states. By defining a common interface for each state, the state machine can swap one class for another, as long as they share that interface.
To use interfaces for a state machine, you’ll typically need a State Controller script that holds a reference to the Current State, which can be any state that implements the IState Interface. This interface specifies the functions that each state must include, allowing the state machine to use them interchangeably.
public class StateMachineController : MonoBehaviour
{
    private IStateMachine currentState;

    private void Update()
    {
        currentState.UpdateState();
    }

    public void ChangeStateMachine(IState newState)
    {
        currentState.OnExit();
        currentState = newState;
        currentState.OnEnter();
    }
}

public interface IStateMachine
{
    void OnEnter();
    void UpdateState();
    void OnHurt();
    void OnExit();
}
In this example, the IState interface defines four functions that states must implement: On Enter, Update State, On Exit, and On Hurt. The Update State function is called every frame, the On Enter function is called when a new state becomes active, and the On Exit function allows states to decommission themselves when they’re disabled.
The On Hurt function, which is called by the controller, allows states to easily transition to the Hurt State if necessary.
To create each state, simply create a class that implements the IState interface and includes the required functions. Unlike the State Controller class, states do not need to inherit from MonoBehaviour.
public class PatrolState : IStateMachine
{
    public void OnEnter()
    {
        Debug.Log("What was that!?");
    }

    public void UpdateState()
    {
        // Search for player
    }

    public void OnHurt()
    {
        // Transition to Hurt State
    }

    public void OnExit()
    {
        Debug.Log("Must've been the wind");
    }
}
Repeat the coding process for each states that your behaviors requires.
As the state class implements the IStateMachine interface, it is required to include the On Enter, Update State, On Hurt, and On Exit functions. This enables it to be treated as an IState class type instead of its specific class type, allowing each state to be passed into the current state variable interchangeably.
Now the question is, where will the state controller obtain each state from?
There are two ways to manage the different states in your state machine. One way is to create a new instance of the state whenever the state is changed.
ChangeState(new PatrolState());Then, when you want to change state, simply pass the reference of the new state you want to switch to, into the Change State function.
ChangeState(chaseState);However, there is a challenge with this approach. Even though the State Controller can switch from one state to another, the exit routes from a given state, and the conditions that can cause a transition, exist inside the State itself. For instance, it’s up to the Patrol State to decide whether the player has been found, leading to the Chase State, or if enough time has passed, that the enemy should go back to the Sleep State.
However, the state class doesn’t know what’s happening to the object it’s attached to. Plain class instances cannot access the game object they’re attached to, unlike Monobehaviour scripts, making it challenging for the state to interact with the world around it and determine when the state needs to change. Even if it could, it would not be able to change the state itself, as only the state controller can modify the state.
So, how can you pass information to the state so that it knows what’s happening to the object, and how can you transmit a message back to the controller, so that it knows when to trigger a state transition? One approach is to incorporate a reference to a State Controller in one or more of the State Interface’s mandatory functions.
How to make a State Machines in Unity (using Inheritance)
To make a State Machine using inheritance in C#, you can follow these general steps:
- Create a base State class that all other states will inherit from. This class should define the common properties and methods that all states will have.
- Create a separate class for each specific state that inherits from the base State class. Each of these classes should override the methods in the base class to provide their own unique functionality.
- Create a State Machine class that will manage the different states. This class should have a property that represents the current state and methods for transitioning between states.
- Create an instance of the State Machine class and set the initial state.
Here’s an example implementation:
// Define the base State class
public abstract class State {
    public abstract void Enter();
    public abstract void Update();
    public abstract void Exit();
}

// Define a specific state that inherits from the base State class
public class IdleState : State {
    public override void Enter() {
        // Enter idle state
    }

    public override void Update() {
        // Update idle state
    }

    public override void Exit() {
        // Exit idle state
    }
}

// Define another specific state that inherits from the base State class
public class MoveState : State {
    public override void Enter() {
        // Enter move state
    }

    public override void Update() {
        // Update move state
    }

    public override void Exit() {
        // Exit move state
    }
}

// Define the State Machine class
public class StateMachine {
    private State currentState;

    public void SetState(State newState) {
        if (currentState != null) {
            currentState.Exit();
        }

        currentState = newState;

        if (currentState != null) {
            currentState.Enter();
        }
    }

    public void Update() {
        if (currentState != null) {
            currentState.Update();
        }
    }
}

// Create an instance of the State Machine and set the initial state
var stateMachine = new StateMachine();
stateMachine.SetState(new IdleState());

// Update the State Machine each frame
void Update() {
    stateMachine.Update();
}
In this example, we define a base State class with three abstract methods that are overridden in specific state classes.
In this code, we start by creating a base state class called State. This class contains the virtual functions EnterState(), UpdateState(), and ExitState(), which we’ll use in our derived state classes.
A virtual function is a function in the base class that can be overridden by a derived class. This allows us to define the function in the base class, but still allow each derived class to provide its own implementation of the function if needed.
Next, we create a derived state class called IdleState. This class inherits from the State class, which means it has access to all of the virtual functions defined in the base class. We override the EnterState() function to print out a message indicating that the object has entered the idle state.
We also create a derived state class called MoveState, which also inherits from the State class. In this class, we override the EnterState() function to print out a message indicating that the object has entered the move state, and we also implement the UpdateState() function to move the object across the screen.
Finally, in our StateMachine class, we create a variable to hold the current state, and we use this variable to call the virtual functions EnterState(), UpdateState(), and ExitState() on the current state as needed.
By using inheritance in this way, we can easily create new state classes by simply deriving them from the State base class and providing our own implementations of the virtual functions. This allows us to quickly build up a complex state machine by reusing code and leveraging the power of object-oriented programming.
How to make a State Machines in Unity (using third party assets)
Using third-party assets is a popular approach to creating state machines in Unity without writing any code. This method involves using pre-built tools that provide a visual interface for designing the state machine and generating the required code.
The Unity Asset Store offers several third-party assets that allow you to create state machines visually, without writing any code. These assets usually provide a graphical interface for creating states and transitions, and generate the necessary code for you. Some popular examples include PlayMaker, Behavior Designer, and NodeCanvas.
PlayMaker is a popular visual scripting tool that allows you to create state machines using a drag-and-drop interface. It uses a system of states, actions, and transitions to define the behavior of your game objects. PlayMaker includes a wide range of pre-built actions, and you can also create custom actions using C# scripts.
Behavior Designer is another popular visual scripting tool that allows you to create complex AI behaviors using a state machine system. It includes a range of pre-built behaviors, such as pathfinding and target selection, and you can also create custom behaviors using C# scripts.
NodeCanvas is a complete AI system that allows you to create sophisticated AI behaviors using a range of tools, including state machines, behavior trees, and finite state machines. It provides a powerful visual editor for designing your AI, and allows you to use C# scripts to customize your AI behaviors.
Using third-party assets can be a great option if you’re not comfortable writing code, or if you’re looking to save time and effort when creating your state machine. However, it’s important to note that these assets usually come with a price tag, and may require some additional learning to get started.
Related Posts:
: A Comprehensive Guide to Implementation and Best Practices")


A game developer that wants to share its knowledge and experience with other game developers-