Finite State machines, or FSM / SM, are a crucial aspect of game production, providing a modular and flexible way to create complex game logic. In Unity3D, FSM can be used to control character movement, Artificial Intelligence, and UI systems, among other things. In this article, we’ll explore the basics of implementing Finite State Machines in Unity, including implementation, best practices, and advanced concepts, to help you use them effectively in your projects.
Managing the various game states of all game’s objects can be tough when creating complex game mechanics. This is where SMs come in. In Unity3d, it is a system for managing the various states of a game object, such as idle, walking, running, jumping, attacking, and so on. By using an SM, you can create a structured and organized approach to managing these different states, making your code more modular, maintainable, and flexible.
One of the main benefits of using an FSM in Unity3d is that it simplifies complex game logic. Create clear states for your game objects and define the conditions that cause them to change from between states. This will make it easier to modify and follow the logical flow of your game mechanics. For example, consider the following code snippet:
if (isIdle) { // Do idle animation } else if (isWalking) { // Do walking anim } else if (isRunning) { // Do running anim } else if (isJumping) { // Do jumping anim } else if (isAttacking) { // Do attacking anim }
This code uses a series of if-else statements to determine the active state of a game object and perform the appropriate animations. While this approach may work for a few states, it quickly becomes unwieldy as more states are added. By using a SM, you can define these states & transitions in a visual editor, making it easier to manage and modify your game logic.
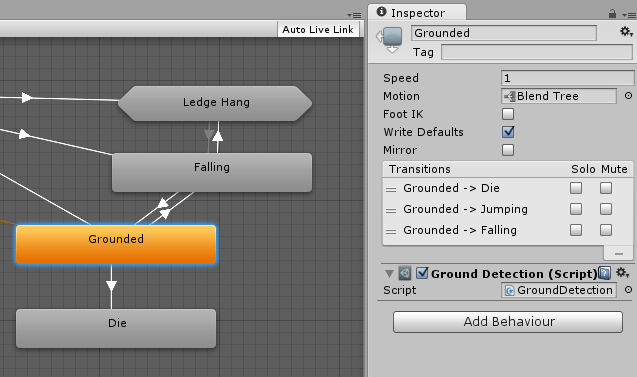
Unity’s built-in SM system, called Mechanim, allows you to create and manage FSMs for your game objects using a graphical interface. With Mechanim, you can define states and state switching, and conditions, as well as specify anim clips, blend trees, and other clip variables.
In summary, FSMs are a powerful tool for managing complex game mechanics in Unity3D. By using a SM, you can simplify your code, make it more modular and maintainable, and create responsive and dynamic game mechanics. In the next sections, we’ll explore how to implement FSMs in Unity, best practices for working with them, and more advanced concepts.
Finite State Machines in Unity – Animation Controller
II. What is a Finite State Machine?
An SM is a useful tool for managing game logic. You can create a variety of states for your game object and easily switch between them. These states and change conditions can be defined visually in Unity’s Animator window or through scripting.
At its core, it consists of three main components: states, transitions, and conditions.
States represent a particular behaviour or mode that an object can be in. For example, a player character might have states for standing, walking, running, and jumping. Each state has associated animations, sounds, and other game logic. Usually, there are two minimum states the Entry and Exit state, that are executed when getting into or out of the State. Only One state at a time is allowed.
Transitions define the conditions under which an object moves from one state to another. For example, to going from the standing state to the walking state might be triggered when the player presses the “W” key. They can be triggered by events or by checking conditions, such as the value of a variable.
Conditions are used to determine whether it is possible to change from a state to another is allowed to occur. For example, going from the walking state to the running state might only be allowed if the player is moving fast enough. Conditions can be defined using scripting, animator parameters, or other game logic.
Here’s an example of a simple SM for a player character in Unity3D game engine:
In this example, the player character has two states: walking and jumping. The walking state is triggered when the player presses the up arrow key, and the jumping state is triggered when the player presses the spacebar. The conditions for these switches are defined using the animator variables and Input.GetKeyDown.
III. Why Use a Finite State Machine?
SMs are an essential concept in game creation, particularly for controlling game logic. In Unity3D, they can help simplify complex logic and improve organization, flexibility, and modularity. Here are a few examples of how SMs can be particularly useful the production process:
Character Movement: SMs are ideal for controlling character movement, especially when dealing with many states such as idle, walking, running, jumping, and crouching. For instance, you can use one to ensure that a character can’t jump while crouching or walking.
enum MovementState { Idle, Walking, Running, Jumping, Crouching } MovementState current_State; void Update() { switch (current_State) { case MovementState.Idle: // Character is idle break; case MovementState.Walking: // Character is walking break; case MovementState.Running: // Character is running break; case MovementState.Jumping: // Character is jumping break; case MovementState.Crouching: // Character is crouching break; } }
Artificial intelligence : SMs can be used to control Artificial behaviors, particularly when dealing with different states such as attacking, defending, and fleeing. For example, you can use one to ensure that an enemy AI will attack the player only when the player is within a certain range.
enum AIState { Idle, Attacking, Defending, Fleeing } AIState currentState; void Update() { switch (currentState) { case AIState.Idle: // AI is idle break; case AIState.Attacking: // AI is attacking break; case AIState.Defending: // AI is defending break; case AIState.Fleeing: // AI is fleeing break; } }
UI Systems: SMs are useful for controlling UI behavior, such as button states and menu navigation. You can use it to make a button appear and work differently depending on whether it’s selected or clicked.
By using SMs, you can ensure that your game logic is organized and easy to modify. Additionally, you can reduce the chances of errors and improve overall efficiency in your game creation’s process.
IV. Implementing a Finite State Machine in Unity3D
Coding a SM in Unity3D is easy, thanks to the built-in Animator window. In this section, we’ll walk you through the process of creating a basic one for a 2D character using the Animator window. We’ll also discuss different types of SMs available in Unity3D, and how to trigger state switches using scripting.
A. Creating a State Machine in Unity3D’s Animator Window
For this, you’ll first need to create an Animator Controller asset. Here’s how to create one:
Right-click in the Project window and select “Create > AnimatorController”.
Rename the new asset to something meaningful, like “PlayerAnimatorController”.
Double-click the asset to open it in the Animator window.
With the Animator window open, you can start creating states, transitions, and conditions for your SM. Here’s how:
Create a new state by right-clicking in the Animator window and selecting “Create State > Empty”.
Rename the state to something meaningful, like “Idle”.
Add an animation clip to the state by dragging its file from the Project window onto the state.
Create another state for walking by right-clicking and selecting “Create State > Empty”.
Rename the state to “Walk”.
Add a walking clip to the state.
To interconnect the Idle and Walk states, follow these steps:
Click on the Idle state to select it.
Click and drag from the “Any State” node to the Walk state to create a new change between states.
Select it and set a condition that its triggers, such as “Speed > 0”.
Finite State Machines in Unity3D – Playmaker
B. Types of State Machines
Unity3D provides two types of SMs: Mechanim and Playmaker..
Mechanim is Unity3D’s built-in SM system, which we’ve used in the example above. It’s powerful, flexible, and widely used in Unity3D the process of creating a videogame.
Playmaker is a visual scripting tool that uses FSMs to create game logic. It’s designed to be easy to use, even for non-programmers.
C. Triggering State Changes with Scripting
While you can create SMs entirely using the Animator window, you can also trigger SM changes using scripting. Here’s an example of how to trigger a transfer from idle to walking using C# code:
public class PlayerMovement : MonoBehaviour { public float speed = 5f; private Animator animator; void Start() { animator = GetComponent<Animator>(); } void Update() { float moveHorizontal = Input.GetAxisRaw("Horizontal"); float moveVertical = Input.GetAxisRaw("Vertical"); Vector3 movement = new Vector3(moveHorizontal, moveVertical, 0f); transform.position += movement * speed * Time.deltaTime; if (movement.magnitude > 0) { animator.SetBool("isWalking", true); } else { animator.SetBool("isWalking", false); } } }
In this example, the code checks for key/button presses from the player and moves the character accordingly. If the character is moving, it sets a bool variable in the Animator component to trigger a state switch from idle to walking.
By using scripting in conjunction with SMs, you can create more complex game logic that responds to player actions and events.
With these techniques, you should be able to create your own SMs in Unity3D and use them to create powerful and flexible game logic.
V. State Machine Best Practices
When working with these elements in Unity3D, there are several best practices to keep in mind that can help ensure efficient and effective implementation. Here are some tips to consider:
1. Keep state diagrams simple and easy to understand.
Use clear, descriptive names for all elements.
Avoid excessive nesting of states and conditions.
Example:
// Good state diagram structure: Idle -> Run -> Jump // Excessive nesting: Idle -> Moving -> Running -> Sprinting
2. Use sub-SMs and SM layers to manage complex game logic.
They are SMs within a state-machine, used to manage more complex states. SM layers allow for separate SMs to be managed independently and can help organize game logic.
Example:
// Using a sub-state machine to manage different movement states: Movement -> Walk -> Run -> Jump // Using state machine layers to manage different player states: Player State Machine Layer -> Movement State Machine -> Jump State Machine
Properly define state conditions to avoid errors.
State conditions determine when a state switch occurs. Make sure state conditions are defined properly to ensure smooth and accurate state changes.
Example:
// Good state condition definition: playerVelocity > 0 // Poor state condition definition: playerVelocity != 0
By following these best practices, you can create efficient and effective FSMs in Unity3D that help streamline gamedev phase and improve game logic.
VI. Advanced SM Concepts
Besides the basic parts like states, transitions, and conditions, there are also some advanced SM concepts that can assist you in designing intricate and interactive game features. Here are some examples:
1. SM Hierarchies:
Hierarchies allow you to nest SMs within each other, creating a more organized and modular system. This can be useful for managing complex game logic, such as character behavior and Artificial Intelligence.
For example, let’s say you have a player character that can switch between different modes of movement, such as walking, running, and jumping. Each mode could be its own SM, with its own states, transitions, and conditions. You could then create a parent SM that manages the different movement modes, and switches between them based on player actions or game events.
Here’s some code that demonstrates how to set a state-machine hierarchy in Unity3D:
// Create a new Animator Controller for the player character AnimatorController playerController = new AnimatorController(); // Create a new statemachine for each movement mode AnimatorStateMachine walkingStateMachine = playerController.CreateStateMachine("Walking"); AnimatorStateMachine runningStateMachine = playerController.CreateStateMachine("Running"); AnimatorStateMachine jumpingStateMachine = playerController.CreateStateMachine("Jumping"); // Add the movement mode statemachines as sub-state-machines to the parent state-machine AnimatorStateMachine parentStateMachine = playerController.layers[0].stateMachine; parentStateMachine.AddStateMachine(walkingStateMachine); parentStateMachine.AddStateMachine(runningStateMachine); parentStateMachine.AddStateMachine(jumpingStateMachine);
2. Blend Trees:
Blend trees allow you to smoothly blend between different anim states, creating more natural and responsive character movement. This can be useful for things like character movement, camera behavior, and UI effects.
For example, let’s say you have a character that can move in different directions, such as forward, backward, left, and right. You could create a blend tree that blends between the different movement directions, based on the character’s key events.
Here’s some code that demonstrates how to create a blend tree in Unity:
// Create a new Animator Controller for the player character AnimatorController playerController = new AnimatorController(); // Create a new blend tree for character movement AnimatorBlendTree movementBlendTree = playerController.CreateBlendTree("Movement"); // Add motion clips for each movement direction to the blend tree AnimatorStateClip forwardClip = new AnimatorStateClip(); forwardClip.motion = Resources.Load<AnimationClip>("Forward"); movementBlendTree.AddChild(forwardClip); AnimatorStateClip backwardClip = new AnimatorStateClip(); backwardClip.motion = Resources.Load<AnimationClip>("Backward"); movementBlendTree.AddChild(backwardClip); AnimatorStateClip leftClip = new AnimatorStateClip(); leftClip.motion = Resources.Load<AnimationClip>("Left"); movementBlendTree.AddChild(leftClip); AnimatorStateClip rightClip = new AnimatorStateClip(); rightClip.motion = Resources.Load<AnimationClip>("Right"); movementBlendTree.AddChild(rightClip); // Set the blend tree parameters to control the character's movement movementBlendTree.blendParameter = "MovementDirectionX"; movementBlendTree.blendParameterY = "MovementDirectionY";
3. Procedural Animations and Random Events
State-machines can also be used to create dynamic game content, such as procedural anims and random events. For example, you could use an SM to generate random terrain or enemy behavior, or to create procedural animated effects for things like particle effects or UI elements.
Here’s some code that demonstrates how to create a state-machine for procedural animations:
// Create a new state-machine for the particle effect AnimatorStateMachine particleStateMachine = particleController.layers[0].stateMachine; // Create a new state for the particle effect AnimatorState particleState = particleStateMachine.AddState("Particle"); // Add a behavior to the particle state to control the particle effect ParticleBehavior particleBehavior = particleState.AddStateMachineBehaviour<ParticleBehavior>(); // Implement the particle behavior script to create a procedural particle effect public class ParticleBehavior : StateMachineBehaviour { public GameObject particlePrefab; public float spawnRate; private float timer; override public void OnStateUpdate(Animator animator, AnimatorStateInfo stateInfo, int layerIndex) { timer += Time.deltaTime; if (timer > 1 / spawnRate) { GameObject particleInstance = Instantiate(particlePrefab, animator.transform.position, Quaternion.identity); Destroy(particleInstance, 3.0f); timer = 0; } } }
In this example, we create a SM that generates a procedural particle effect. It consists of a single state, which has a behavior attached to it that controls the particle effect.
The ParticleBehavior script uses the OnStateUpdate function to spawn new particles at a rate determined by the spawnRate variable. The particles are created as instances of the particlePrefab GameObject, which is passed in as a public variable.
4. State-Machine Behaviors
State-Machine Behaviors are scripts that you can attach to states to extend their functionality beyond what is possible with the built-in Animator State behaviors. They allow you to add custom functionality to your states, such as playing sounds, spawning particles, or modifying gameplay variables.
To create a State-Machine Behavior, you need to create a new script that inherits from the StateMachineBehaviour class. Here’s an example of a simple SM Behavior that plays a sound when the state is entered:
using UnityEngine; public class PlaySoundOnEnter : StateMachineBehaviour { public AudioClip soundClip; public float volume = 1.0f; override public void OnStateEnter(Animator animator, AnimatorStateInfo stateInfo, int layerIndex) { AudioSource.PlayClipAtPoint(soundClip, animator.transform.position, volume); } }
In this example, we create a new script called PlaySoundOnEnter that inherits from StateMachineBehaviour. We define two public variables: soundClip, which is the AudioClip we want to play, and volume, which is the volume we want to play the sound at.
The OnStateEnter function is called when the state is entered. In this function, we use AudioSource.PlayClipAtPoint to play the sound at the position of the Animator.
To use this script in our state-machine, we simply attach it to a state in the same way that we would attach an Animator State behavior. Once attached, the script will be called whenever the state is entered, and the sound will be played.
SM Behaviors can be used to create complex game mechanics and interactions by allowing you to add custom functionality to it. For example, you could create a State-Machine Behavior that spawns enemies when the player enters a certain state, or that modifies the behavior of other objects in the game world based on its actual state.
5. State-Machine Scripting
In addition to creating and modifying SMs in the editor, you can also control them using scripting. This gives you greater control over their behavior at runtime, allowing you to create dynamic and interactive game mechanics that respond to player actions or other events.
To control an SM using scripting, you first need to get a reference to the Animator component that it is attached to. This can be done using the GetComponent function:
This is just one example of how they can be used to create dynamic game content. By combining its power with procedural generation techniques, you can create unique and engaging gameplay experiences that are different every time you play.
Animator animator = GetComponent<Animator>();
Once you have a reference to the animator, you can use the SetTrigger function to trigger a change between states:
animator.SetTrigger("Jump");
This code would trigger a switch from the in-execution state to a state named “Jump”, assuming that such a state exists in the animator’s SM.
You can also use the SetFloat function to set the value of a float parameter in the animator component, which can be used to control the behavior of the SM:
animator.SetFloat("Speed", 1.5f);
This code would set the value of a float parameter named “Speed” to 1.5, which could be used by the animator’s state-machine to adjust the speed of an animation or other behavior.
By using scripting to control your state-machines, you can create complex game mechanics that respond to player control or other events in real time. For example, you could use SM scripting to create a game where the player’s movement speed increases as they collect power-ups, or where different enemies have different attack patterns based on their distance from the player.
Overall, SM scripting is a powerful tool that can be used to create dynamic and engaging gameplay experiences. By combining the flexibility of state-machine scripting with the other advanced concepts covered in this article, you can create complex and sophisticated game mechanics that will keep your players coming back for more.
Risks with improperly implemented Finite State Machines in Unity
When coding state machines in Unity, it’s important to structure your finite state machines carefully to avoid common pitfalls and unexpected behavior. A major risk is state explosion, where you end up with an unmanageable number of states that turn your FSM into spaghetti code. This makes it hard to understand transitions between states like idle, walk, attack etc for your AI entities.
God objects can also become an issue if you put too much logic in a parent StateMachine class rather than properly encapsulating it in each State subclass. Your NPC behaviors should utilize individual states with focused logic.
Scope issues arise if states start modifying objects they shouldn’t touch, leading to state logic bleed across the FSM. Circular transitions can occur if states like walk and run changestate back and forth infinitely.
Use enums rather than strings for state names to avoid confusion. Properly initialize the starting state in a given FSM to avoid null errors. Call base Enter() and Exit() methods when overriding in each state class.
Test your FSM thoroughly to catch issues like impossible transitions or concurrency bugs from multi-threaded state logic. Utilize a visual state machine editor to debug and design your finite state transitions effectively.
Overall, keep your FSM modular, isolated, and simple. Avoid state explosion or spaghetti transitions by focusing on meaningful states in your Unity AI. Keep state logic encapsulated and scoped properly.
Conclusions: Finite State Machines in Unity
State-machines are an essential tool for game developers, allowing you to create complex game logic in a modular and flexible way. In this article, we explained the basics of Unity3D, including how to use them, tips for best practices, and advanced concepts for making game content more dynamic.
By using this concept in the game engine, you can simplify complex game logic and make your game programming more efficient and flexible. For example, you can use state-machines to control character movement, AI, and UI systems. Let’s take a look at a simple example of usage to control character movement:
public class PlayerMovement : MonoBehaviour { public Animator animator; public float speed = 5.0f; void Update() { float horizontal = Input.GetAxis("Horizontal"); float vertical = Input.GetAxis("Vertical"); if (Mathf.Abs(horizontal) > Mathf.Abs(vertical)) { if (horizontal > 0) { animator.SetInteger("MovementState", 1); } else if (horizontal < 0) { animator.SetInteger("MovementState", 2); } } else { if (vertical > 0) { animator.SetInteger("MovementState", 3); } else if (vertical < 0) { animator.SetInteger("MovementState", 4); } } transform.position += new Vector3(horizontal, 0, vertical) * speed * Time.deltaTime; } }
In this example, we’re using an Animator component to control the player’s movement. We’re using the SetInteger() method to change the player’s movement state based on their actions. This allows us to easily control the player’s movement logic .
To get started with state-machines in Unity, we recommend using the built-in Mechanim system or the Playmaker plugin. You can also find many tutorials and resources online to help you learn more about these and how to use them effectively in your videogame.
Overall, SMs are a powerful tool for game developers, and we encourage you to explore their potential in your own projects. With careful planning and implementation, they can help you create more engaging and dynamic game content.
What are your thoughts on the matter? Don’t hesitate to leave your opinion in the comments section. Also, check regularly on our blog as we are posting several articles on this and other topics associated with videogame development.
Q: What is a state-machine and why is it important in game development?
A: It is a design pattern that models the behavior of an object or system by dividing it into a set of distinct states. It is important in games production because it helps manage the different states an object or character can be in, and how it changes between those states.
Q: How can I implement a state-machine in Unity?
A: To implement a SM in the game engine, you can use the recommended FSM or Finite State-Machine library available on the Asset Store. This library provides a framework for creating and managing SMs in your projects.
Q: How do I define states and transitions in a state-machine?
A: In a state-machine, states are defined as individual classes that inherit from a base state class. Switching between states are typically triggered by certain conditions or events, and are implemented using if-else statements or switch statements.
Q: How do I handle user input in a state-machine?
A: It can be handled by checking for controllers events in the Update() method of the active state class. Based on the input received, you can determine the next state to change to.
Q: Can I use state-machines in 2D game development?
A: Yes, state-machines can be used in both 2D and 3D videogame development. The concept of states and transitions remains the same, regardless of the dimensionality of your game.
Q: How can I access the current state of a state machine?
A: In Unity, you can access the active state of a state-machine by using a reference to the state class. This reference can be stored as a property or a field in the class.
Q: Can I have multiple state machines in the same Unity project?
A: Yes, you can have multiple FSMs in the same project. Each of them is independent and can have its own set of states.
Q: How can I handle animations using state machines?
A: They can be handled by defining animation states for each state in the SM. When changing between states, you can trigger the appropriate one to be played.
Q: Can I use state machines for non-player characters (NPCs) in Unity?
A: Yes, FSMs are commonly used for controlling the behavior of non-player characters (NPCs) in the engine, and that allow them to behave differently based on the current state and user input.
Q: Are there any best practices for implementing state machines in Unity?
A: Yes, some best practices for implementing FSMs include using inheritance to create base classes for states, using a cache for storing references to frequently used states, and organizing your state classes and transitions in a way that is easy to understand and maintain.
We use cookies on our website to give you the most relevant experience by remembering your preferences and repeat visits. By clicking “Accept”, you consent to the use of ALL the cookies.
This website uses cookies to improve your experience while you navigate through the website. Out of these, the cookies that are categorized as necessary are stored on your browser as they are essential for the working of basic functionalities of the website. We also use third-party cookies that help us analyze and understand how you use this website. These cookies will be stored in your browser only with your consent. You also have the option to opt-out of these cookies. But opting out of some of these cookies may affect your browsing experience.
Necessary cookies are absolutely essential for the website to function properly. This category only includes cookies that ensures basic functionalities and security features of the website. These cookies do not store any personal information.
Any cookies that may not be particularly necessary for the website to function and is used specifically to collect user personal data via analytics, ads, other embedded contents are termed as non-necessary cookies. It is mandatory to procure user consent prior to running these cookies on your website.
Subscribe to our newlettersDon´t miss our latest posts
Level Up Your Game Dev Skills!
Join our newsletter for exclusive tips and tricks aimed at helping developers just like you create amazing games.


")


 Intellectual Property Protection and Rights in the Games Industry and Video Game Development")
