

The Raycast in Unity is an integral part of game development that allows developers to create connections between objects and perform various checks and calculations. It is a powerful tool that is essential for any beginner looking to enhance their game development skills.
Understanding how to use this function effectively is crucial for creating immersive and engaging games.
In this article, we will try to provide a comprehensive guide on mastering Unity’s Raycast function for game development. We will cover everything from the basics of creating and controlling Rays to advanced techniques like limiting Raycast by Max Distance or Layer Masks.
By the end of this article, you will have a thorough understanding of how to use the Raycast function in Unity and be able to implement it into your game development projects with ease.
So, let’s dive in and explore this essential feature in Unity game development.
Raycast in Unity Key Takeaways
- Raycast function in Unity is essential for creating immersive and engaging games
- Raycast physics enables developers to create interactions between objects, perform ground checks, and establish line of sight connections
- Troubleshooting tips include limiting the Raycast by max distance or layer masks, and understanding the differences between Raycasts in 3D and 2D
- Advanced techniques involve manipulating ray properties such as origin, direction, and max distance, and utilizing different types of raycasts
Raycast in Unity
Overview and Basics
Raycast physics is a crucial aspect of game development, as it enables developers to create interactions between objects, perform ground checks, and establish line of sight connections.
The Raycast function works by projecting a ray into the scene and returning a boolean value if a target is successfully hit. The function also stores information about the hit, such as distance, position, or reference to the object’s Transform, in the Raycast Hit variable.
One of the key components of the Raycast function is the Ray variable, which represents a point of origin and direction for the Ray to travel. The origin is the position where the Ray starts from and takes a Vector 3 value, while the direction property takes a trajectory in the form of a normalised Vector 3.
Additionally, this subtopic also covers troubleshooting tips such as limiting the Raycast by max distance or layer masks, and understanding the differences between Raycasts in 3D and 2D.
By mastering the basics of the Raycast function, game developers can create more complex and interactive gameplay mechanics in their projects.
Creating and Controlling Rays
To effectively utilize the power of this fundamental tool for game creation, a comprehensive understanding of the intricacies involved in creating and controlling rays is imperative. Creating a ray involves defining its origin and direction, which can be achieved by creating a new Ray variable and defining its Vector3 properties. The direction property can be normalized to ensure a consistent direction, and the ray can be limited by max distance or layer masks.
using UnityEngine; public class RaycastExample : MonoBehaviour { void Update() { // Cast a ray from the camera to mouse position Ray ray = Camera.main.ScreenPointToRay(Input.mousePosition); // Create a RaycastHit variable to store hit information RaycastHit hit; // Check if the ray hits any object if (Physics.Raycast(ray, out hit)) { // Print the name of the object that was hit Debug.Log("Hit object: " + hit.transform.name); // If you want to do something specific when hitting an object, you can add code here // For example, you can check if the object has a specific tag and perform an action accordingly: if (hit.transform.CompareTag("Target")) { Debug.Log("You hit a target!"); // Do something specific for hitting a target // ... } } } } This script casts a ray from the main camera towards the mouse position on each frame update. It then checks if the ray hits any objects in the scene. If it does, it prints the name of the object and performs any additional actions based on your requirements.
Controlling ray trajectory is essential for game development, as different objects require different ray properties. For example, a ray used for detecting ground collision should be pointed downwards, while a ray for detecting line of sight should be pointed towards the desired target. Adjusting ray properties can be achieved by manipulating the Ray variable, such as changing its origin or direction properties. Additionally, the RaycastHit variable can provide information about the hit object, such as its distance or position, allowing for further control over the ray’s behavior.
| Property | Description | Example |
|---|---|---|
| Ray.origin | Starting point of the ray | new Vector3(0,0,0) |
| Ray.direction | Direction of the ray | Vector3(0,1,0) |
| RaycastHit.distance | Distance from the ray’s origin to the hit object | hit.distance |
| RaycastHit.point | Position of the hit object | hit.point |
| RaycastHit.transform | Transform of the hit object | hit.transform |
In summary, mastering the creation and control of rays in Unity is crucial for any game developer. By understanding the properties involved in creating a ray and adjusting them for different objects, developers can create more effective and efficient game mechanics.
Advanced Techniques
Advanced techniques for controlling rays in game creation involve manipulating ray properties such as origin, direction, and max distance, and utilizing different types of raycasts such as Raycast All and Raycast Non-Alloc, to create more complex and dynamic game mechanics.
RaycastAll
using UnityEngine; public class RaycastExample : MonoBehaviour { void Update() { // Define the ray starting position and direction Ray ray = new Ray(transform.position, transform.forward); // Perform a raycast and get all hits RaycastHit[] hits = Physics.RaycastAll(ray); // Iterate through all the hit objects foreach (RaycastHit hit in hits) { // Do something with each hit object, for example print its name Debug.Log("Hit object: " + hit.collider.gameObject.name); } } }In this example, we define a ray starting from the current position of the game object and pointing forward. We then perform a RaycastAll operation using Physics.RaycastAll, which returns an array of all objects that were hit by the ray. We iterate through each RaycastHit in the array and do something with it.
RaycastNonAlloc
using UnityEngine; public class RaycastExample : MonoBehaviour { private RaycastHit[] hits = new RaycastHit[10]; void Update() { // Define the ray starting position and direction Ray ray = new Ray(transform.position, transform.forward); // Perform a non-allocating raycast and pass in a pre-allocated array for storing hit results int numHits = Physics.RaycastNonAlloc(ray, hits); // Iterate through all valid hit results based on numHits value for (int i = 0; i < numHits; i++) { // Do something with each hit object, for example print its name Debug.Log("Hit object: " + hits[i].collider.gameObject.name); } } }In this example, we define a ray and perform a RaycastNonAlloc operation using Physics.RaycastNonAlloc. The second parameter is a pre-allocated array of RaycastHits, in this case with a size of 10. The method returns the number of valid hits, which we use to iterate through and process each hit result.
Both RaycastAll and RaycastNonAlloc are useful for performing raycasts in Unity, but their difference lies in memory allocation. RaycastAll allocates memory for every hit, while RaycastNonAlloc allows you to pass in a pre-allocated array to avoid unnecessary memory allocation.
Raycast optimization
Raycast optimization is a crucial aspect of game development, especially for games with large numbers of objects in the scene. One optimization technique is to use Layer Masks to limit the number of objects that the raycast needs to check against. Another optimization technique is to use Raycast Non-Alloc instead of Raycast All, as it is more memory-efficient.
LayerMasks
using UnityEngine; public class RaycastExample : MonoBehaviour { public LayerMask targetMask; // The layer(s) we want to hit void Update() { if (Input.GetMouseButtonDown(0)) { Ray ray = Camera.main.ScreenPointToRay(Input.mousePosition); // Create a ray from the mouse position RaycastHit hit; if (Physics.Raycast(ray, out hit, Mathf.Infinity, targetMask)) // Cast the ray and check for collision with specified layers { Debug.Log("Hit object: " + hit.collider.gameObject.name); // Do something with the object that was hit } } } }- First, we declare a public LayerMask variable called
targetMask. This variable is used to define which layers our raycast should detect collisions with. - In the
Update()method, we check if the left mouse button is pressed usingInput.GetMouseButtonDown(0). - We then create a new ray using
Ray ray = Camera.main.ScreenPointToRay(Input.mousePosition). This will create a ray starting from the camera position and going through the mouse position in world space. - Next, we use
Physics.Raycast()to cast our ray and check for collisions. The parameters are: the ray we created (ray), an output parameter for storing information about any collisions (out hit), the maximum distance that the ray can travel (Mathf.Infinityallows it to travel indefinitely), and finally the layer mask we want to use for collision detection (targetMask). - If there is a collision detected,
Physics.Raycast()will return true. We can access information about what was hit through thehitvariable. In this example, we simply log the name of the hit object usingDebug.Log("Hit object: " + hit.collider.gameObject.name). - You can then perform any desired actions or logic based on the object that was hit.
Remember to attach this script to a game object in your scene for it to work properly.
GameOject tags
Another advanced technique is detecting specific object types with raycasts. This involves using a combination of Layer Masks and tags to filter out unwanted objects and only detect specific types. For example, in a first-person shooter game, a raycast can be used to detect only enemies with the ‘Enemy’ tag, while ignoring other objects in the scene.
Using GameObject tags with raycasts can be a useful technique in game development.
- Assigning Tags: First, you need to assign tags to the game objects you want to interact with using raycasts. Tags can be assigned in the Unity editor by selecting a game object and going to the Inspector window. Under the “Tag” dropdown, you can choose an existing tag or create a new one.
- Raycasting: Raycasting is a technique that allows you to cast a virtual ray from a point in a specific direction and detect any collisions along its path. In Unity, you can use the
Physics.Raycastmethod to perform raycasts. - Using Tags with Raycasts: To utilize tags with raycasts, you need to specify the desired tag as one of the parameters when calling
Physics.Raycast. This way, only objects with that specific tag will be detected by the raycast.
Below is an example of using tags with raycasts.
using UnityEngine; public class RaycastExample : MonoBehaviour { public LayerMask targetMask; // The layer(s) we want to hit void Update() { if (Input.GetMouseButtonDown(0)) { Ray ray = Camera.main.ScreenPointToRay(Input.mousePosition); // Create a ray from the mouse position RaycastHit hit; if (Physics.Raycast(ray, out hit)) { // Check if the hit object has a specific tag if (hit.collider.CompareTag("YourTagName")) { // Perform actions specific to this type of object Debug.Log("Hit an object with tag 'YourTagName'!"); // ... } } } } }By using CompareTag() method, you can check if the hit object belongs to a specific tag and perform custom actions accordingly.
Remember to assign unique and descriptive tags to your game objects for better organization and easier identification during raycasting.
Shape Based raycasts
Shape-based raycasts, such as SphereCast and CapsuleCast, offer powerful collision detection options beyond traditional raycasts. By using shapes like spheres and capsules instead of simple rays, these casts allow you to check for collisions along the surface of the shape, providing more flexibility in detecting object interactions. In this section, we’ll explore how to use SphereCast and CapsuleCast in Unity, along with example code snippets to help you get started.
Here’s a section on using shape-based raycasts like SphereCast and CapsuleCast:
SphereCast:
A SphereCast is similar to a raycast, but instead of using a single point as the origin and direction, it uses a sphere to check for collisions along its surface. This can be useful when you need to detect collisions with objects based on their proximity to the surface of a sphere.

To perform a SphereCast, you’ll need to specify the center position of the sphere, its radius, and the direction in which it will be cast. Additionally, you can provide a maximum distance for how far the cast should travel.
Here’s an example code snippet showcasing how to perform a SphereCast in Unity using C#:
using UnityEngine; public class SphereCastExample : MonoBehaviour { public float radius = 1f; public float maxDistance = 10f; void Update() { Vector3 origin = transform.position; Vector3 direction = transform.forward; RaycastHit hitInfo; if (Physics.SphereCast(origin, radius, direction, out hitInfo, maxDistance)) { // Collision detected Debug.Log("SphereCast hit: " + hitInfo.collider.gameObject.name); } } }CapsuleCast:
A CapsuleCast is similar to a SphereCast but uses a capsule shape instead. A capsule consists of two spheres connected by a cylinder. This type of cast can be particularly useful for detecting collisions between characters or objects with non-zero volumes.
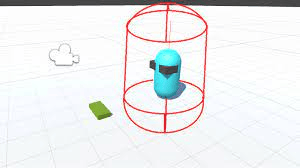
To perform a CapsuleCast, you’ll need to specify the start and end points of the capsule’s central axis, its radius, and the direction in which it will be cast. You can also provide additional parameters such as height and orientation.
Here’s an example code snippet showcasing how to perform a CapsuleCast in Unity using C#:
using UnityEngine; public class CapsuleCastExample : MonoBehaviour { public float radius = 0.5f; public float height = 2f; public float maxDistance = 10f; void Update() { Vector3 point1 = transform.position + Vector3.up * (height / 2); Vector3 point2 = transform.position - Vector3.up * (height / 2); Vector3 direction = transform.forward; RaycastHit hitInfo; if (Physics.CapsuleCast(point1, point2, radius, direction, out hitInfo, maxDistance)) { // Collision detected Debug.Log("CapsuleCast hit: " + hitInfo.collider.gameObject.name); } } }Remember to attach these scripts to an appropriate GameObject in your scene for the casts to work correctly. Feel free to customize the code as per your specific requirements.
These techniques can also be used to detect objects of a certain color or material, or to detect objects that are within a certain distance range from the player. By utilizing these advanced raycast techniques, game developers can create more immersive and engaging gameplay experiences for their players.
There are several other shape casts based systems that are plenty documented in the unity documentation.
Seeing and Debuging Raycasts
As we have seen
Raycasting is a fundamental technique in game development that involves projecting a virtual ray into the scene and detecting any collisions with objects. This powerful tool allows developers to simulate light rays, projectiles, or other forms of interaction within their games. However, ensuring accurate and reliable raycast behavior can be challenging, especially when dealing with complex scenes or intricate collision detection logic.

In this section, we will explore various techniques and strategies for effectively debugging raycasts in Unity. Debugging raycasts plays a crucial role in identifying issues such as incorrect hit detections, unexpected interactions, or inaccurate visualization of the raycast path. By gaining insights into how to debug raycasts properly, you will be able to fine-tune your game’s physics interactions and ensure smooth gameplay experiences for your users.
We will start by discussing common pitfalls and challenges associated with raycasting in Unity. Understanding these challenges will help you anticipate potential issues that may arise during development. Next, we will delve into practical strategies for debugging raycasts effectively. This includes using visual indicators, logging relevant information about hits or misses, leveraging Unity’s built-in tools like Gizmos and Debug.DrawRay(), and exploring advanced debugging techniques using breakpoints or conditional breakpoints.
Throughout this section, we will provide code examples and step-by-step instructions to illustrate each technique. Whether you are new to raycasting or an experienced developer looking to enhance your debugging skills, this section will equip you with the knowledge and tools needed to troubleshoot raycast-related issues efficiently.
using UnityEngine; public class RaycastDebugger : MonoBehaviour { void Update() { // Create a raycast from the mouse position Ray ray = Camera.main.ScreenPointToRay(Input.mousePosition); // Perform the raycast and store the hit information RaycastHit hit; if (Physics.Raycast(ray, out hit)) { // Print the name of the object hit by the raycast Debug.Log("Hit: " + hit.collider.gameObject.name); // Draw a line to visualize the raycast in the scene view Debug.DrawLine(ray.origin, hit.point, Color.red); } } }In this example, a RaycastHit struct is used to store information about objects that are hit by a raycast. The Physics.Raycast method is called to perform the actual raycasting. If an object is hit, its name is logged using Debug.Log(), and a red line is drawn to visualize the path of the raycast in the scene view using Debug.DrawLine().
Why use it for debugging and other purposes?
- Debugging: You can use raycasts to visually inspect your game’s physics interactions. By drawing lines or visual indicators when a collision occurs, you can easily identify any issues with your collision detection logic.
- Interaction: Raycasts are commonly used for player interaction with objects in games. For example, you might use them to determine what object an NPC is looking at or where a player is aiming their weapon.
- AI Pathfinding: Raycasts can be utilized by AI agents to navigate around obstacles or avoid colliding with other characters or objects in their environment.
- Environment Analysis: Raycasts can be employed for environmental analysis tasks such as detecting walls, determining line-of-sight, or identifying areas with specific characteristics.
Using raycasts for debugging and other purposes provides a powerful tool for understanding and manipulating the physics and interactions within your Unity project.
Frequently Asked Questions
How do you use Raycast to detect collisions with non-collidable objects such as particles or UI elements?
Raycast can detect collisions with non-collidable objects such as particles or UI elements by using the UI layer or a custom layer. Using Raycast for UI interactions requires setting the correct layer mask, while raycasting with particles involves using a custom shader to cast the ray.
Can Raycast be used to detect collisions between two moving objects, and if so, what are some considerations to keep in mind?
Detecting collisions between moving objects using Raycast is possible in Unity. Optimizing Raycast performance can be done by limiting the frequency of calls, reducing the distance of the Ray, and avoiding complex colliders. Considerations include object speed and timing of Raycast calls.
Are there any performance considerations when using Raycast in large-scale scenes with many objects?
How does Raycast performance hold up in large-scale scenes with many objects? Optimization techniques, such as using Layer Masks, limiting Max Distance, and using Raycast Non-Alloc instead of Raycast All, can significantly improve performance.
Can Raycast be used to detect collisions with objects that are outside of the camera’s field of view?
Detecting occluded objects with Raycast is possible, but it may not be optimal for performance. Optimizing raycast performance requires limiting the range and frequency of checks, using layer masks, and implementing caching or other advanced techniques.
How can you use Raycast to create advanced visual effects such as laser beams or heat-seeking missiles?
To create realistic laser beams using Raycast in Unity, developers can use particle systems with customized textures and colors. Implementing heat seeking missile mechanics requires adding logic to the Raycast Hit variable to track and target the nearest object identified within a certain range.
Conclusion
In this tutorial, we have covered the fundamentals of using Raycast in Unity. We started as beginners, understanding the concept of raycasting and how it can be used to detect collisions and interact with objects in our game world.
Throughout the tutorial, we explored various use cases of Raycast, such as detecting hits on terrain, walls, and even enemies. We also learned about different properties and parameters that can be adjusted to fine-tune our raycasting experience.
By now, you should have a solid understanding of how Raycast works and how it can elevate your game development skills. But remember, mastering Raycast takes practice and experimentation.
we encourage you to leave any comments or questions below. If there’s something specific you’d like me to cover in a future blog post, let me know! Your feedback is valuable and will help me improve future tutorials.
If you’d like to read more articles related to game development and Unity tips, make sure to visit our blog. There, you’ll find additional resources that dive deeper into various topics and techniques.
Thank you for joining us on this journey on mastering Raycast in Unity. Now go ahead and apply your newfound knowledge to create amazing games!
Happy coding!
Related Posts:

: A Comprehensive Guide to Implementation and Best Practices")


A game developer that wants to share its knowledge and experience with other game developers-