

In this Unity tutorial “How to Use Late Update in Unity” we will explain what is the purpose and how to use the LateUpdate function in Unity, which is a built-in function that runs after the Update function in the game loop. The tutorial provides a step-by-step guide for creating a simple script that demonstrates the LateUpdate function.
Introduction on How to use Late Update in Unity
The LateUpdate function is an important feature in Unity that can help game developers achieve smoother and more responsive gameplay. In this tutorial, we’ll be exploring how to use the LateUpdate function in Unity to create smoother camera movement in our games.
Explanation of the LateUpdate function in Unity
The LateUpdate function is a built-in function in Unity that is called after the Update function in the game loop. The purpose of LateUpdate is to allow for changes to be made to the scene after all Update functions have been called. This is useful for scenarios where we want to ensure that all game object transformations and animations have been updated before we perform other actions in the game.
Purpose of LateUpdate:
The LateUpdate function is especially useful for camera movement in Unity. Cameras are often used to follow player movements or track objects in the game, and using LateUpdate can help ensure that the camera movement is smoother and more responsive. By waiting until all object transformations and animations have been updated before moving the camera, we can prevent jittery or choppy movement that can be distracting for the player.
Overview of what will be covered in the tutorial
In this tutorial, we’ll be exploring how to create a simple script in Unity that demonstrates the use of LateUpdate for camera movement. We’ll start by setting up a new project in Unity and creating a simple scene with a camera and a cube. We’ll then create a new C# script and implement the LateUpdate function to achieve smoother camera movement in the scene. Finally, we’ll explore some of the benefits of using LateUpdate and provide suggestions for further learning and exploration of Unity programming.
- Setting Up the Project
Unity is a game engine that allows developers to create 2D or 3D games using a range of tools and features. In order to start using the LateUpdate function in Unity, you first need to set up a new project and create a simple scene with a camera and a cube.
Creating a new project in Unity:
- Open Unity Hub and create a new project by clicking on the “New” button in the top-right corner of the window.
- Give your project a name and choose a location to save it.
- Select “3D” as the template for your project.
Setting up a simple scene with a camera and a cube:
- Once your new project has been created, you’ll be taken to the Unity Editor. To create a new scene, go to “File” > “New Scene” in the top menu.
- In the Hierarchy window, right-click and select “3D Object” > “Cube” to create a new cube in the scene.
- With the cube selected, go to the Inspector window and adjust the scale, rotation, and position as desired.
- To add a camera to the scene, go to “GameObject” > “Camera” in the top menu.
- With the camera selected, go to the Inspector window and adjust the position, rotation, and field of view as desired.
Explanation of the importance of having a camera in the scene for LateUpdate:
The LateUpdate function in Unity is used to update the position and rotation of game objects after the Update function has finished executing. This can be useful for situations where you want to ensure that certain game logic or events have been completed before updating the position or rotation of an object.
In the context of camera movement, LateUpdate is particularly useful for smoothing out the movement of the camera as the player moves through the game world. This is because the camera needs to be updated after the player has moved in order to follow their position accurately.
In order to use LateUpdate for camera movement, you need to have a camera in the scene. The camera should be attached to a parent object that is used to control its movement and rotation. By updating the parent object’s position and rotation in LateUpdate instead of Update, you can achieve smoother camera movement that is synced up with the player’s movement.
Here’s an example of how you might use LateUpdate to move the camera in a simple Unity scene:
public class CameraController : MonoBehaviour
{
    public Transform player;
    public Vector3 offset;

    void LateUpdate()
    {
        transform.position = player.position + offset;
    }
}
In this example, the camera is attached to a parent object (the CameraController script) that has a reference to the player object and a vector representing the offset between the camera and the player. In LateUpdate, the position of the CameraController object is updated to be the position of the player object plus the offset vector, resulting in smooth camera movement that follows the player’s position accurately.
3. Creating the Script
In this section, we will create a new C# script in Unity and implement the LateUpdate function in it. We will also provide an overview of the Update and LateUpdate functions and explain the order in which they are called.
Creating a new C# script in Unity
- In the Unity editor, go to the Project window and create a new folder called “Scripts” (if you haven’t already).
- Right-click the “Scripts” folder and select “Create > C# Script” from the context menu.
- Name the script “CameraController” and double-click it to open it in your default code editor.
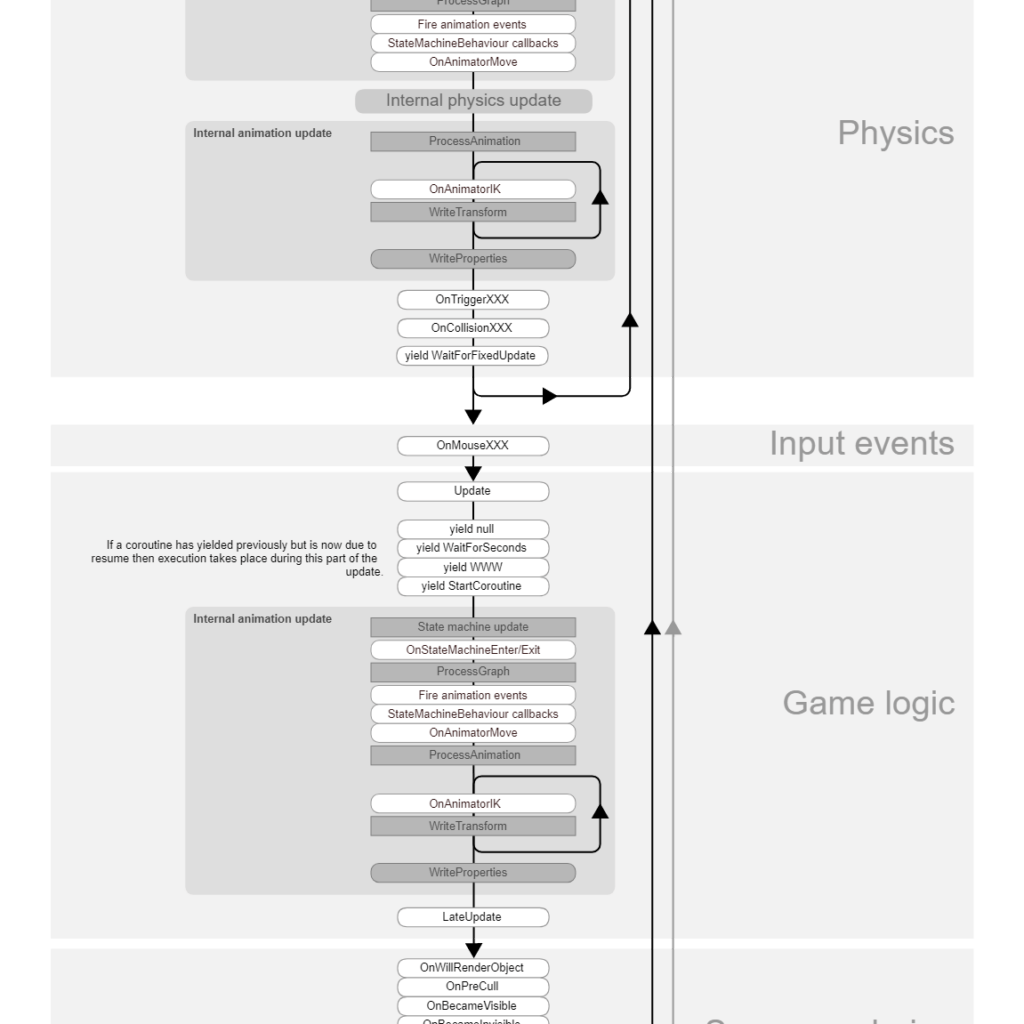
Overview of the Update and LateUpdate functions
The Update function in Unity is called once per frame and is typically used for game logic that needs to be executed every frame. This function is called before all other Update functions in the scene, so it’s important to keep in mind that other scripts may modify game objects before the current script’s Update function is called.
The LateUpdate function in Unity is also called once per frame, but it’s called after all other Update functions in the scene. This function is useful for game logic that needs to be executed after all other game objects have been updated for the frame. For example, the LateUpdate function can be used to smooth out camera movement and ensure that the camera’s position and rotation are updated after all other game objects have moved.
Implementing the LateUpdate function in the script
1. In the CameraController script, add the following code to define the LateUpdate function:
void LateUpdate()
{
    // Code to be executed in LateUpdate
}
2. Within the LateUpdate function, add code to update the camera’s position and rotation based on the position and rotation of the game object that the camera is following. For example:
void LateUpdate()
{
    transform.position = target.position + offset;
    transform.rotation = target.rotation;
}
In this example, “transform” refers to the transform component of the camera, “target” is a reference to the game object that the camera is following, and “offset” is a Vector3 value that represents an offset from the target’s position.
4. Explanation of the order in which the Update and LateUpdate functions are called
In Unity, the order in which scripts’ Update and LateUpdate functions are called is determined by the order of their execution in the Script Execution Order settings. By default, scripts are executed in the order in which they are added to game objects in the scene. However, the Script Execution Order settings allow you to customize the order in which scripts are executed to ensure that they are executed in the desired order.
It’s important to keep in mind that other scripts may modify game objects before the current script’s Update function is called. This means that any changes made to game objects in the current script’s Update function may be overwritten by other scripts’ updates before the LateUpdate function is called. To ensure that the current script’s changes are preserved, it’s often best to make those changes in the LateUpdate function instead.
Using LateUpdate to Smooth Camera Movement
The Update function in Unity is used to update game objects and their properties every frame. However, using the Update function for camera movement can result in jittery or stuttering camera movement because other game objects may also be updated in the same frame. This can cause the camera to move in a choppy manner.
To achieve smoother camera movement, the LateUpdate function can be used. The LateUpdate function is called after all Update functions have been called on all game objects, ensuring that the camera movement occurs after all other game objects have been updated. This makes LateUpdate a good choice for updating the camera position, rotation, and other properties that depend on the position of other game objects.
Here’s an example of how to use LateUpdate to achieve smoother camera movement:
using UnityEngine;

public class CameraController : MonoBehaviour
{
    public Transform target;
    public float smoothing = 5f;

    private Vector3 offset;

    private void Start()
    {
        offset = transform.position - target.position;
    }

    private void LateUpdate()
    {
        Vector3 targetPosition = target.position + offset;
        transform.position = Vector3.Lerp(transform.position, targetPosition, smoothing * Time.deltaTime);
    }
}
In this example, the CameraController script is attached to the main camera in the scene. The script has a public Transform variable called target, which is used to specify the object that the camera should follow. The script also has a public float variable called smoothing, which controls the speed at which the camera moves.
In the Start function, the script calculates the initial offset between the camera and the target object. This offset is used to ensure that the camera follows the target object at a consistent distance.
In the LateUpdate function, the script calculates the target position of the camera by adding the offset to the position of the target object. The script then uses the Lerp function to smoothly move the camera from its current position to the target position. The smoothing variable is used to control the speed of the camera movement.
By using LateUpdate instead of Update for camera movement, the camera movement will be smoother and less jittery.
It’s worth noting that LateUpdate can be used for other types of game objects as well. For example, if a game object needs to always face the camera, LateUpdate can be used to ensure that the game object’s rotation is updated after the camera has moved. The LateUpdate function can be a powerful tool for ensuring that game objects are updated in the correct order, resulting in smoother and more responsive gameplay.
5. Conclusion How to Use Late Update in Unity
In this tutorial, we have learned how to use the LateUpdate function in Unity to achieve smoother and more responsive gameplay. By using LateUpdate instead of Update for camera movement and other game objects, we can ensure that our movements are always in sync with the game’s physics engine.
Recap of the Benefits of Using LateUpdate in Unity
Some of the key benefits of using LateUpdate in Unity include:
- LateUpdate runs after Update, so we can ensure that our movements are always in sync with the physics engine and other components that run during Update.
- LateUpdate can help us achieve smoother and more responsive gameplay by minimizing the delay between user input and the resulting movement on the screen.
- LateUpdate can be used for any type of game object, not just cameras.
Summary
In this tutorial, we covered the following topics:
- An overview of the LateUpdate function and its purpose in Unity
- Setting up a simple scene with a camera and a cube
- Creating a new C# script in Unity and implementing the LateUpdate function
- Using LateUpdate to smooth out the movement of the camera in the scene
- Examples and explanation of the differences between using Update and LateUpdate for camera movement
- Suggestions for using LateUpdate for other types of game objects as well
Suggestions for Further Learning and Exploration of Unity Programming
If you are interested in learning more about Unity programming, there are a variety of resources available to help you. Some suggestions include:
- Unity’s official documentation, which provides detailed information on the various components and features of the engine: https://docs.unity3d.com/Manual/index.html
- Online tutorials and courses, which can provide step-by-step guidance on specific topics: https://learn.unity.com/
- Unity’s asset store, which provides a wide range of pre-made assets and plugins that can be used to enhance your games: https://assetstore.unity.com/
- Community forums and social media groups, where you can connect with other Unity developers and get advice and support: https://forum.unity.com/ and https://www.reddit.com/r/Unity3D/
Final Thoughts
By using LateUpdate in our Unity projects, we can achieve smoother and more responsive gameplay, and ensure that our movements are always in sync with the physics engine and other components that run during Update. With the resources available for learning and exploring Unity programming, there is no limit to what we can create and achieve in the world of game development.
Related Posts
You can find more tutorials about unity on our blog
Related Posts:


A game developer that wants to share its knowledge and experience with other game developers-